The Menu Bar
There are a number of menu options available to you under the menu bar. The File menu contains the following functions: New, Load Character File, Close Window, Save Character File, Save As Character File, Export, and Load Data File. The Edit menu consists of standard cut, copy, past and select all functions and won't be described here. They work as they do in any program. The Window menu lists all the windows you have open and can allow you to switch between them quickly. If there are less than two windows open, it will not show anything available there. The Help menu consists of an About option, Check for Updates, and a selection that will load this documentation into your web browser.
The File Menu
The New selection will spawn a new window ready to receive character information.
The Load Character File selection will open a dialogue asking you to locate the character
file. If the data file in use when the character in question was last saved is different from
the data file you currently have loaded, the program will present you with an informative alert.
The Open Recent menu item contains a list of the ten most recently opened character files.
Click a selection here to rapidly re-load a character.
The Close Window selection will close your current window.
The Save Character File selection will save your character to the current location. If you
loaded the character from disk, then it will remember that location and save the character there. Or,
if you have already used Save As, then it will remember that location and save the character there.
If this is a new character and you have not yet saved it anywhere, it will prompt you to select
a location for the file. You may also rename the file at this time.
The Save As Character File selection will prompt you to select a location for the file.
By default, the program will assume you want the file named after the name you typed in the Name
field, but you can change this to something else if you want in this dialog.
The Export selection will bring up a window containing your character's XML information
along with the option to select a variety of different kinds of export. This will allow you to view
your character in a text editor, web page (previews are possible), in wiki code, or you can use
a stylesheet of your own custom design to tranform your character into any other type of text
document. See the Export section for
details.
The Load Data File selection will bring up a dialog that prompts you for the location of
a datafile. Any XML file is technically feasible, but note that only those files with information
pertinent to UniForge will have any use here. UniForge comes with a number of datafiles ready for
you to use. These are usually located within the systemdata folder, which is in the same place
the UniForge application is located. See the
Customizing section for details on how
to customize these files for your particular game.
The Character Portrait selection pulls up a blank window with a frame. If you drag and
drop an image here, then the next time you save the character this image will be permanently
added. On Mac OS X you can drag any PICT, bmp, jpg, gif, or png file or image (for instance, you
could drag an image from your web browser to this portrait frame) to this space. The program will
save the file in PICT format and place it next to your character file when you next save it. On
Windows, BMP files and images are supported by default. If you have QuickTime on your computer, you may also
also drop gifs, jpegs, and pngs. The Linux version also supports all these formats except for jpeg.
Note: If you wish to clear out the image that is loaded here next time you open the character,
simply go to the bmp or pict file next to your character file in the Finder (or Windows Explorer on
Windows) and delete it.
The Character Journal selection will bring up a handy separate window in which you can record
session events, thoughts and personal notes. Currently, the Journal is not exported to web or text
when you do an Export of your character. The Journal is meant for private notes the players wishes
to keep secret. However, enterprising XSL programmers can very easily customize the XSL export file
or create a new one to include the Journal.
The Quit option appears here for the Windows and Linux versions of UniForge. In Mac OS X
the Quit option appears under the UniForge menu. When selected, the program will shut down. If there
are any unsaved characters, the program will warn you about each one that has not yet been saved
and give you a chance to do so before quitting.
The Format Menu
This menu contains formatting functions available under the Description and Equipment tabs. It also has hot keys associated with the functions to facilitate formatting while you type.
The Tab Menu
The Tab Menu simply facilitates switching between the various tabs in a given character window. For your convenience, keyboard shortcuts are provided. On Macintosh, hold down the Command (Apple) key and press the number corresponding to the tab you wish to switch to. On Windows, hold down the Control key instead. There is no additional functionality provided here compared to simply clicking the tab you want to move to. Note that a reminder of which tab corresponds to witch number is listed next to the heading of each tab. Thus, to switch to the Skills tab, press and hold Control (or Command for Macintosh) and press the "2" key.
The Help Menu
The About UniForge selection will bring forth a window with the UniForge logo on it. Here you'll see the version of UniForge you are running as well as what books your currently-loaded data file references. Click anywhere on the window to make it disappear.
The Check For Updates selection is best used when you have a connection to the Internet.
When you select this, it will show you what version of the program you are currently running. It
will also automatically check for any available updates across your network connection. If it finds
one, it will present you with the currently available version and present you with an option to
download the latest UniForge archive. To do so, simply click the blue, underlined "Get it!". (This
only appears if UniForge has indeed found an available, downloadable file.)
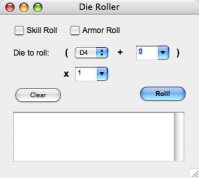
The Dice Roller selection will present you with a separate window where you can select a type of die
to roll, add a numerical amount to the base die roll (useful in resolving Skill Tasks and Attribute Tests,
or adding a bonus to damage rolled) and apply a multiplier (useful in rolling up damage done in an
attack). Click the checkbox to remove the multiplier option, since this is only useful when rolling
for damage.
The Help selection will bring up this documentation in your web browser.
<<AFMBE is copyright Eden Studios, Inc. 1999-2001. AFMBE and
logo are trademarks of Eden Studios, Inc. The AFMBE trademark is used without Eden
Studio's permission and Eden Studios is not responsible for the content of this
site.>>
<<Armageddon, CJ Carella's WitchCraft, Abomination Codex,
Mystery Codex and Unisystem is copyright CJ Carella 1996-2003. Armageddon, CJ
Carella's WitchCraft, Abomination Codex, Mystery Codex and Unisystem is a trademark
of CJ Carella. Armageddon, CJ Carella's WitchCraft, Abomination Codex, Mystery Codex
and Unisystem is published under exclusive license by Eden Studios. The Armageddon,
CJ Carella's WitchCraft, Abomination Codex, Mystery Codex and Unisystem trademark is
used without Mr. Carella's or Eden Studios' permission and neither of those parties
is responsible for the content of this site.>>